[AI] C# Onnx Object Detection with Winforms
소개
기존 솔루션에 기능을 추가하기위해, 또한 시대에 맞춰서 AI를 접목한 기능을 추가하기 위해, C#을 사용하여
Desktop의 screen을 캡처하고, Onnx 모델을 사용하여 Object Detection을 하는 방법을 찾고 있었습니다.
해당 기능이 누군가에게는 도움이 될 수 있을 것 같아서, 기록해둡니다.
물론 그게 나일지는 모르겠지만….
사용된 기술
- C# (DotNet 4.6.1)
- Winforms
- OnnxRuntime
- Onnx 모델
- YOLOv5
사전 준비
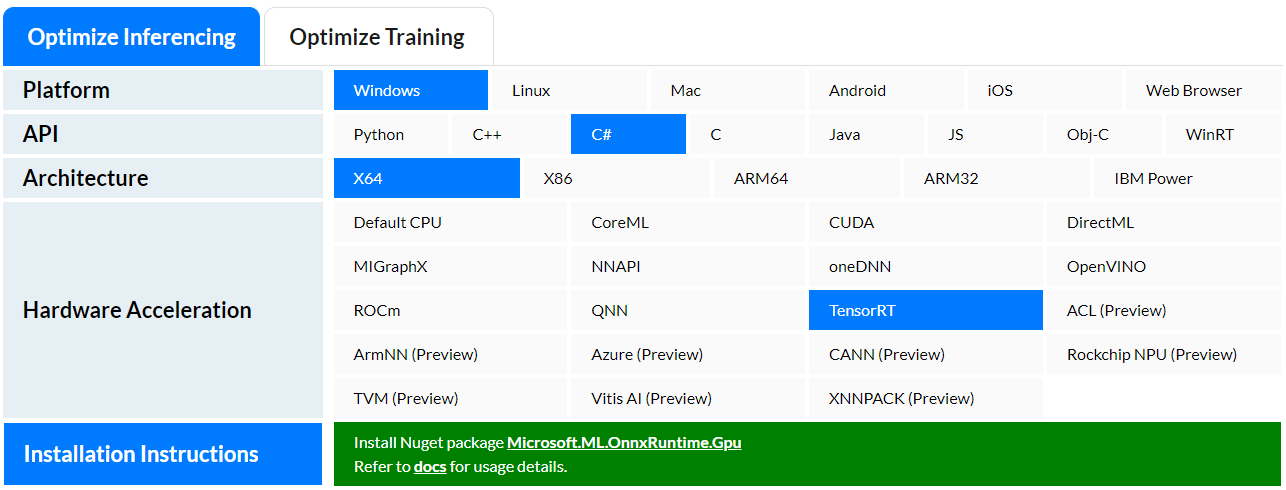
OnnxRuntime
OnnxRuntime은 Microsoft에서 개발한 오픈소스 라이브러리로,
Onnx 모델을 사용하여 AI를 적용할 수 있습니다.
OnnxRuntime은 C#, C++, Python 등 다양한 언어를 지원합니다.
만약 내가 어떠한 환경에서 어떠한 하드웨어를 사용할지 모르겠다면,
OnnxRuntime의 하단에보면 최적화형태를 소개하고 있습니다.
Onnx 모델
Onnx 모델은 AI를 적용하기 위한 모델로, 다양한 AI 모델을 Onnx 모델로 변환할 수 있습니다.
기존 모델의 형태는 다양한데, Tensorflow, Pytorch, Caffe 등이 있습니다.
(pt, pb, h5, pbtxt, caffe, caffemodel 등등)
사용된 모델
본 글에서는 YOLOv5 모델을 사용하였습니다.
해당 Repository에서는 다양한 모델을 제공하고 있습니다.
Yolov5s 모델을 Export하여 Onnx 모델로 변환하였습니다.
Export Onnx Model
Yolov5s 모델을 Export하여 Onnx 모델로 변환하는 방법은 아래와 같습니다.
python models/export.py --weights yolov5s.pt --img 640 --batch 1
NETRON 사용
NETRON은 Onnx 모델을 시각화하여 확인할 수 있는 툴입니다.
본 글에서는 NETRON을 사용하여 Onnx 모델을 확인하였습니다.
코드 설명
작업의 흐름은 아래와 같다.
- 화면 캡처
- 캡처한 화면을 Onnx 모델에 입력
- Onnx 모델의 결과를 화면에 출력
- 1번으로 돌아가기
1. Onnx 모델 로드
// 전역 또는 클래스 멤버 변수로 선언
private InferenceSession session;
private string inputName;
private string outputName;
private List<Tuple<RectangleF, string, float>> rectData;

// 생성자 또는 초기화 메서드에서 선언
session = new InferenceSession("yolov5s.onnx");
inputName = session.InputMetadata.Keys.FirstOrDefault();
outputName = session.OutputMetadata.Keys.FirstOrDefault();
rectData = new List<Tuple<RectangleF, string, float>>();
2. 화면 캡처
화면 캡처는 Winforms의 Panel 컨트롤을 사용하였습니다.
해당 Panel에 PictureBox를 추가하고, 추론의 결과를 PictureBox에 출력합니다.
Point screenPoint = capturePanel.PointToScreen(Point.Empty);

// 스크린 캡처 로직
Bitmap bmp = new Bitmap(capturePanel.Width, capturePanel.Height);

using (Graphics g = Graphics.FromImage(bmp as Image))
{
    g.CopyFromScreen(screenPoint.X, screenPoint.Y, 0, 0, capturePanel.Size);
}

//캡처한 화면을 Onnx 모델에 입력
OnnxRuntime_ObjectDetect(bmp);
3. Onnx 모델의 결과를 화면에 출력
private void OnnxRuntime_ObjectDetect(Image inputImage)
{
    // 입력 이미지를 리사이즈하고 전처리
    Bitmap resizedBitmap = ResizeAndPreprocessImage(inputImage, 640, 640);

    // 이미지를 텐서 형식으로 변환
    var tensorInput = PreprocessImage(resizedBitmap, 640, 640);

    // 기존의 경계 상자 데이터를 클리어
    this.rectData.Clear();

    // 객체 검출 추론 실행
    RunInference(tensorInput);

    // 경계 상자가 그려진 비트맵 생성
    Bitmap bboxBitmap = GenerateBoundingBoxBitmap(inputImage);

    // PictureBox 이미지 업데이트
    pictureBox.Image = bboxBitmap;
}
함수의 흐름을보면 아래와 같다.
- 입력 이미지를 리사이즈하고 전처리
- 이미지를 텐서 형식으로 변환
- 기존의 경계 상자 데이터를 클리어
- 객체 검출 추론 실행
- 경계 상자가 그려진 비트맵 생성
4. 입력 이미지를 리사이즈하고 전처리
private Bitmap ResizeAndPreprocessImage(Image inputImage, int width, int height)
{
    // 입력 이미지를 리사이즈
    Bitmap resizedBitmap = new Bitmap(inputImage, width, height);

    // 리사이즈한 이미지를 전처리
    using (Graphics g = Graphics.FromImage(resizedBitmap))
    {
        g.InterpolationMode = InterpolationMode.HighQualityBicubic;
        g.DrawImage(resizedBitmap, 0, 0, width, height);
    }

    return resizedBitmap;
}
5. 이미지를 텐서 형식으로 변환
Width와 Height는 모델에 맞게 변경해야 합니다.
기존 Yolo 모델의 경우 416 x 416이었는데, Yolov5 모델의 경우 640 x 640으로 변경되었습니다.
yolov5 - Pretrained Checkpoints
해당 링크를 참고하시면, 다양한 모델을 확인할 수 있습니다.
사용한 모델인 Yolov5s의 경우, 640 x 640의 이미지를 입력으로 사용합니다.
Export 하여 Onnx모델로 변환을 하면, 입력 이미지의 크기가 1 x 3 x 640 x 640로 변환됩니다.
혹시나 어떠한 구조로 변환되는지 궁금하신 분들은, NETRON을 사용하여 확인할 수 있습니다.
또한 cocoClasses는 아래와 같습니다.
private string[] cocoClasses = new string[]
{
    "person", "bicycle", "car", "motorcycle", "airplane", "bus", "train", "truck", "boat", "traffic light",
    "fire hydrant", "stop sign", "parking meter", "bench", "bird", "cat", "dog", "horse", "sheep", "cow",
    "elephant", "bear", "zebra", "giraffe", "backpack", "umbrella", "handbag", "tie", "suitcase", "frisbee",
    "skis", "snowboard", "sports ball", "kite", "baseball bat", "baseball glove", "skateboard", "surfboard",
    "tennis racket", "bottle", "wine glass", "cup", "fork", "knife", "spoon", "bowl", "banana", "apple",
    "sandwich", "orange", "broccoli", "carrot", "hot dog", "pizza", "donut", "cake", "chair", "couch",
    "potted plant", "bed", "dining table", "toilet", "tv", "laptop", "mouse", "remote", "keyboard", "cell phone",
    "microwave", "oven", "toaster", "sink", "refrigerator", "book", "clock", "vase", "scissors", "teddy bear",
    "hair drier", "toothbrush"
};
별도 학습된 모델을 사용하지 않고, Yolov5s 모델을 사용하였기 때문에, cocoClasses를 사용하였습니다.
만약 별도 학습된 모델을 사용하신다면, 해당 모델에 맞는 클래스를 사용하시면 됩니다.
private Tensor<float> PreprocessImage(Bitmap inputImage, int width, int height)
{
    // 입력 이미지를 텐서 형식으로 변환
    var tensorInput = new DenseTensor<float>(new[] { 1, 3, width, height });

    // 입력 이미지를 텐서 형식으로 변환
    for (int y = 0; y < height; y++)
    {
        for (int x = 0; x < width; x++)
        {
            var pixel = inputImage.GetPixel(x, y);

            // 이미지의 픽셀 값을 0 ~ 1 사이의 값으로 정규화
            float r = pixel.R / 255.0f;
            float g = pixel.G / 255.0f;
            float b = pixel.B / 255.0f;

            // 이미지의 픽셀 값을 텐서에 입력
            tensorInput[0, 0, y, x] = r;
            tensorInput[0, 1, y, x] = g;
            tensorInput[0, 2, y, x] = b;
        }
    }

    return tensorInput;
}
6. 객체 검출 추론 실행
rectData 변수는 추론 결과를 저장하기 위한 변수입니다.
추론 결과의 경계 상자 데이터를 저장합니다.
private void RunInference(Tensor<float> runs)
{
    // 추론 실행
    var inputs = new List<NamedOnnxValue> { NamedOnnxValue.CreateFromTensor<float>(inputName, runs) };

    // 추론 결과
    using (var results = session.Run(inputs))
    {
        var resultTensor = results.First(r => r.Name == this.outputName).AsTensor<float>();
        ProcessResults(resultTensor.ToArray());
    }

    // 기존의 경계 상자 데이터를 클리어
    this.rectData.Clear();

    // 추론 결과를 경계 상자 데이터로 변환
    Postprocess(results);
}

// 출력 텐서를 처리하여 경계 상자와 신뢰 점수 추출
private void ProcessResults(float[] result)
{
    for (int i = 0; i < result.Length; i += 85)
    {
        float objConfidence = result[i + 4];
        if (objConfidence > 0.5)
        {
            CollectHighConfidenceData(result, i);
        }
    }
}

// 높은 신뢰도를 가진 경계 상자 데이터를 수집
// cocoClasses는 클래스 목록
private void CollectHighConfidenceData(float[] result, int index)
{
    float x = result[index];
    float y = result[index + 1];
    float width = result[index + 2];
    float height = result[index + 3];
    float maxScore = result.Skip(index + 5).Take(80).Max();
    int classIndex = result.Skip(index + 5).Take(80).ToList().IndexOf(maxScore);

    if (maxScore > 0.5)
    {
        RectangleF rect = new RectangleF(x - width / 2, y - height / 2, width, height);
        string className = cocoClasses[classIndex];
        rectData.Add(new Tuple<RectangleF, string, float>(rect, className, maxScore));
    }
}
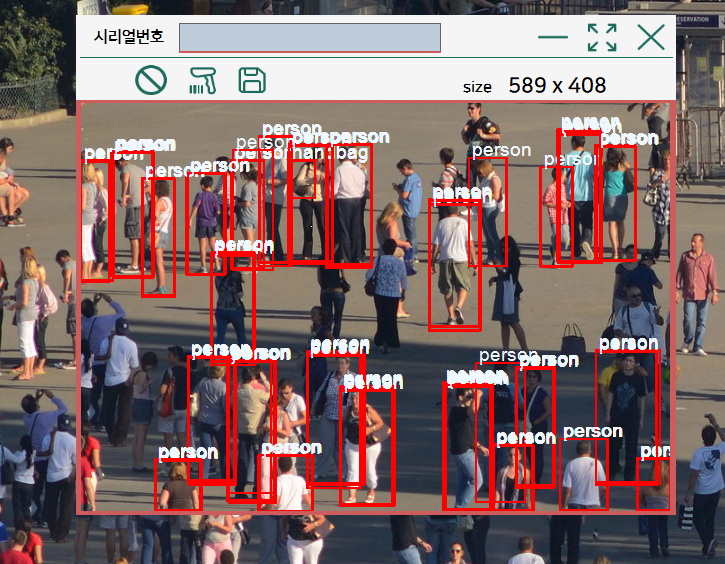
7. 경계 상자가 그려진 비트맵 생성
rectData변수에 저장된 경계 상자 데이터를 사용하여, 경계 상자를 그립니다.
private Bitmap GenerateBoundingBoxBitmap(Image inputImage)
{
    // 입력 이미지를 복사
    Bitmap bboxBitmap = new Bitmap(inputImage);

    // 경계 상자를 그릴 그래픽 객체 생성
    using (Graphics g = Graphics.FromImage(bboxBitmap))
    {
        // 경계 상자를 그릴 펜 생성
        using (Pen pen = new Pen(Color.Red, 2))
        {
            // 경계 상자 그리기
            foreach (var rect in rectData)
            {
                g.DrawRectangle(pen, rect.Item1.X, rect.Item1.Y, rect.Item1.Width, rect.Item1.Height);
                g.DrawString($"{rect.Item2} ({rect.Item3:0.00})", new Font("Arial", 12), Brushes.Red, rect.Item1.X, rect.Item1.Y);
            }
        }
    }

    return bboxBitmap;
}
8. PictureBox 이미지 업데이트
GenerateBoundingBoxBitmap 함수에서 생성한 비트맵을 PictureBox에 출력합니다.
pictureBox.Image = bboxBitmap;
마무리
Desktop의 화면을 캡쳐하여 객체 검출을 하는 방법을 작성하였습니다.
본 글에서는 Yolov5s 모델을 사용하였지만, 다른 모델을 사용하셔도 무방합니다.
만약 GPU 환경이라면, 추론 속도가 더 빠를 것입니다.
코드 전체는 Github 에서 확인하실 수 있습니다.
Note: 만들고나니 내것이 아니었다.
Leave a comment